Procedures
Building a drive that carries several systems
One stick, a folder of ISO files, a menu at power-on. The setup takes ten minutes once and then adding a system means copying a file.
Key points
- Images stay whole files; the loader presents each one to the firmware on demand.
- The data partition remains an ordinary drive you can also use for documents.
- Verify each image before copying it — a bad download looks like a bad drive.
The idea
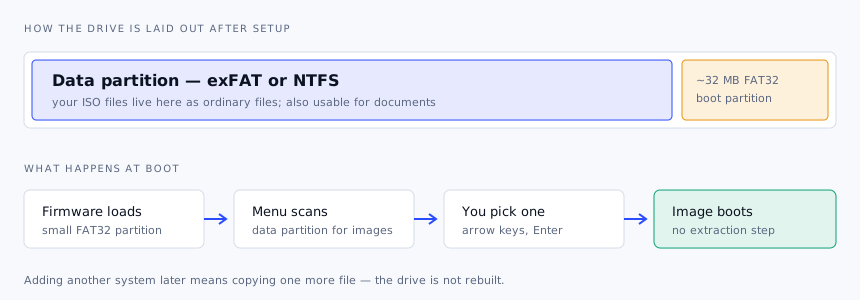
Traditional preparation dedicates a drive to one image. An image loader inverts that: the drive is prepared once with a small boot component, and the images become ordinary files you manage with your file manager. At power-on the loader lists what it finds and boots the entry you choose.
The practical difference shows up over months. A stick with a current Linux release, last year's release for a machine that only works with it, a partition tool, a memory tester and a Windows installer is a stick you actually carry, and none of that required a single reformat after the first day.
How the drive is laid out
Setup creates a small FAT32 partition — tens of megabytes — that firmware can read in either boot mode, plus a large data partition formatted exFAT or NTFS so file size stops being a constraint. Your images live on the second partition. Windows and macOS will typically show only that one, which is the intended behaviour.
Because the images are files rather than a raw copy of a disc, the free space stays free. A 128 GB stick with 30 GB of images has 98 GB you can use for anything else.
Setting it up
Get the tool from its own site
Download from the project directly — for Ventoy that is ventoy.net, with the source code published on GitHub. Compare the released checksum against the file you received before running anything.
Back up the stick
Installation repartitions the device. Anything on it is gone. Confirm the device letter or path — this is the step where people erase the wrong disk.
Run the installer once
Select the USB device, choose the partition style to match the machines you support (GPT for UEFI-only fleets, MBR when older hardware is in scope), and let it write. It finishes in seconds.
Copy images onto the data partition
Drag them in like any other file. Subfolders are fine and make the menu easier to read. Eject properly — a half-flushed write produces an image that fails at boot for no visible reason.
Test before you rely on it
Boot the stick on the machine you actually intend to use it on, and let at least one entry start fully. A virtual machine set to boot from USB works for a quick check of the menu itself.
Keeping it organised
- Keep the release version in the filename —
fedora-workstation-41-x86_64.isobeatslinux.isoin a hurry. - Group by purpose:
/install,/rescue,/tools. Most loaders show the folder structure. - Store the checksum file next to each image so you can re-verify later without hunting for the page.
- Delete superseded releases when you add a new one, or the menu becomes its own problem.
- Keep a plain text note on the drive recording what each image is for and when you last tested it.
When an image will not start
Most failures fall into a short list of causes.
| Symptom | Likely cause | What to try |
|---|---|---|
| Menu appears, entry does nothing | Image not supported by the loader | Check the project's tested-image list; write that one image to a spare stick instead |
| Security message before the menu | Secure Boot verification | Enrol the key when prompted, or adjust the setting in firmware setup |
| Menu is empty | Images on the wrong partition, or an unreadable file system | Confirm files are on the data partition and the copy completed |
| Entry starts, then a kernel panic or blue screen | Corrupt download | Re-verify the checksum and copy again |
| Stick absent from the boot menu entirely | Firmware settings, not the drive | Work through the boot checklist |
Looking after the drive
Update the loader when a release fixes something you have hit — upgrades are designed not to touch the data
partition, but copy anything irreplaceable off first anyway. Re-test the stick after firmware updates on the
machines you support, since dbx revocations can change what boots. And treat the drive as
consumable: flash memory has a finite life, and a rescue stick that fails on the day you need it is the
worst possible time to learn that.